
30 Clever Ideas to Style a Bed Without a Headboard
The bedding is lovely, but something still feels unfinished. That blank wall above the pillows might be why. These bed without headboard ideas will help you give the room a clear focal point.
Whether you are furnishing your first apartment, decorating a small bedroom, or stretching your budget, there are plenty of places to start. A painted arch adds color. Oversized cushions bring softness. Even a quilt you already own can become the detail that pulls everything together.
Below, you will find 30 approaches, from simple bedding changes to more permanent wall treatments. Each includes practical details to help you judge what fits your space. Look for an idea that suits how you actually use your bedroom, including where you read, store essentials, and move around each morning.
Painted Wall Arch

A painted arch gives a bed without headboard a clear focal point without taking up floor space. Choose a shade that contrasts gently with your wall, such as clay against cream. Extend the arch slightly beyond both mattress edges so it frames the bed rather than disappearing behind pillows.
Mark the shape with pencil, string, and a level before painting. Position the top comfortably above your stacked pillows, then check the proportions from the doorway. Two thin coats help create an even finish. For a rented bedroom, get permission before changing the wall color or finish.
Oversized Back Cushions

- Give a bare bed a softer outline with oversized square cushions that rise above your sleeping pillows.
- Measure the mattress width before buying. Two large cushions can suit a narrower bed, while a wider mattress may need three for balanced coverage.
- Choose removable, washable covers in a textured fabric such as linen or cotton canvas. A slightly deeper shade than the wall helps define the arrangement.
- Keep the front layer simple with your sleeping pillows and one small accent cushion. Leave room to sit comfortably without moving a mountain of pillows.
The cushion inserts matter as much as the covers. Very soft inserts can collapse when you lean back, so choose fuller ones if you read in bed. Without a solid backrest, cushions may shift against the wall. A secure bed frame helps keep the arrangement usable.
Lightweight Textile Hanging

Quick Tip:
Let a lightweight textile supply the pattern your bedding is missing. Choose a piece narrower than the bed and position its bottom edge above your pillows so it stays clear when you sit up.
A flat woven hanging softens a blank wall without the bulk of a padded panel. Repeat one thread color in your throw or cushion covers to connect the arrangement. Use secure fixings appropriate to the wall and hanging weight, and keep fabric clear of lamps, heaters, and outlets.
Wallpaper Accent Panel

BEFORE: Even carefully chosen bedding can look disconnected against a completely blank wall. In a small bedroom, the empty area above the pillows often feels more noticeable than the furniture itself.
AFTER: A wallpaper panel gives the bed a defined backdrop and introduces pattern without covering the whole room. Extending it slightly beyond the mattress creates a visible border on both sides.
Choose a small repeating print if your duvet is plain, or a subtle textured design if your bedding already has pattern. Test removable wallpaper on an inconspicuous spot first and follow its surface requirements. Removable adhesive can still lift paint, especially on poorly prepared walls.
Paired Art Prints

- Turn two favorite prints into a focal point by choosing artwork with one shared color. Matching frames help different subjects feel connected.
- Arrange the frames on the floor with a gap of about 2 to 4 inches. Aim for a combined width that stays within the mattress edges.
- Make paper templates and position them above the bed. Sit against your pillows to check that the lower edges remain comfortably clear of your head.
- Install each piece with hardware suited to its weight and your wall type. Lightweight frames with acrylic glazing reduce the weight hanging above the sleeping area.
The pair should read as one arrangement, so center the combined width over the mattress rather than spacing each print toward a nightstand. Keep their top edges level for a tidy finish. Before making holes, check the paper layout from the doorway and both sides of the bed.
Full Wall Curtains

| Detail | Sheer Curtains | Opaque Curtains |
| Visual effect | Airy folds with the wall visible underneath | A solid fabric backdrop with fuller folds |
| Best placement | Over a plain wall or an existing window | Across a visually uneven or distracting wall |
| Daylight at a window | Filters light while keeping the room bright | Reduces light when closed, depending on the fabric |
| Styling partner | Pale bedding and light wood | Simple bedding and richer wood tones |
Missing a headboard? Curtains can give the entire bed wall a softer finish. Mount the rod securely and choose enough fabric for gentle folds when closed. Let hems skim above the floor for easier cleaning. Keep panels clear of heaters and leave access to any windows behind them.
Cozy Corner Bed

DO
- Make an awkward bedroom corner feel purposeful by placing a single bed lengthwise beside the wall.
- Arrange a few firm cushions along the wall side to create a comfortable daytime sitting spot.
- Keep the exposed bedside clear enough for getting in and out comfortably.
- Leave space to tuck in bedding, following any clearance requirements for your bed frame.
DON’T
- Push bedding against a wall showing damp patches or condensation.
- Block a window, radiator, vent, or doorway with the bed.
- Fill the sleeping surface with cushions that have nowhere to go at night.
- Choose this layout for a shared bed unless both sleepers accept access from one side.
Corner placement works especially well in a small guest room that doubles as a reading space. The adjoining walls give the bed a defined outline without extra furniture. Making the bed takes more reaching, though, so a lightweight quilt is usually easier to manage than several tucked layers.
Statement Patchwork Quilt

Result: Bold bedding gives the eye a focal point below the blank wall.
Best For: Renters who want color without changing wall finishes.
Wall Changes: None required.
Styling Key: One patterned quilt, plain pillowcases, and a restrained bedside arrangement.
Let the quilt supply most of the room’s pattern, then repeat one of its quieter colors in your pillowcases. Check the dimensions against your mattress so it drapes generously at both sides. A quilt you already own can make this the simplest update in the room.
Half Painted Wall

Could a single horizontal line make the whole bed area feel more settled? Painting the lower wall a contrasting color creates a broad backdrop that connects the mattress and nightstands. Unlike a shaped accent, the uninterrupted band stretches across the room, giving separate furniture pieces a shared background.
Set the boundary above your tallest pillows so the color remains visible after making the bed. Mark a level line rather than measuring from the floor alone, since floors can be uneven. Sample the shade beside your bedding before committing, and keep leftover paint for touchups.
Matching Bedside Lamps

- Two matching lamps can frame a bare bed as clearly as wall decor. Choose substantial shades that remain visible above the pillows.
- Position the lamps at similar heights on either side of the mattress. Their repeated shapes create balance even when the bedside tables differ.
- Choose shades that conceal the bulbs from your usual reclining position. Test this while sitting in bed before deciding where each lamp belongs.
- Leave usable space beside each lamp for a glass of water and your phone. A narrow base helps when nightstand surfaces are small.
Matching lamps work best when their scale suits the bed. Tiny shades can disappear beside a wide mattress, while oversized bases crowd narrow tables. Before buying a pair, compare the listed dimensions with your available surface space. The goal is a balanced frame with room for everyday essentials.
Botanical Wall Decals
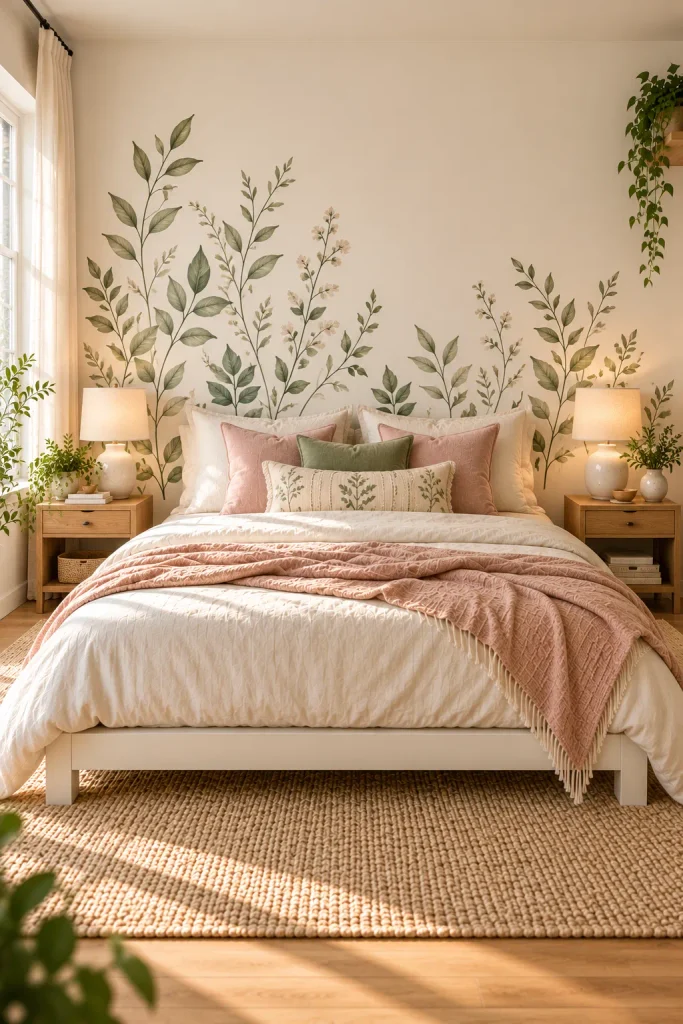
Quick Tip:
A loose cluster of leafy decals can give a plain bed wall movement without covering it completely. Arrange the shapes with more space between them toward the edges, and test the adhesive on a hidden area before applying the full design.
Start with the largest stem slightly off center, then arrange smaller leaves around it. Keep the lowest details visible above your usual pillow arrangement. Decals adhere differently to textured walls and paint finishes, so check the product instructions rather than assuming every removable design will suit your room.
Generous Bedside Rug

BEFORE: A tiny rug can make a bed look stranded in the middle of the floor. With no headboard defining the upper half of the room, the whole arrangement may feel like separate pieces.
AFTER: A larger rug connects the bed to the surrounding floor space and introduces a clear footprint. Visible borders beside the mattress add texture where you see and feel it each morning.
Measure the room before choosing a rug, aiming for roughly 18 to 24 inches of visible coverage beside the mattress where space allows. Position it beneath the lower portion of the bed if a larger size would overwhelm the room. Keep door swings and walking routes clear.
Decorative Wall Molding

- Frame the empty wall with molding to give the bed a built-in backdrop. Sketch one wide central rectangle and narrower side panels before buying materials.
- Mark the layout with painter’s tape, centering the main panel over the mattress. Check that its upper and side edges remain visible around your pillows.
- Measure each section and choose molding with a simple profile. Lightweight trim is easier to handle, but it still needs an attachment method suited to the wall.
- Install according to the trim manufacturer’s instructions, then fill joints and finish as directed. Paint the molding and wall the same shade for a subtle result.
Keep the rectangles generous rather than squeezing several small boxes behind the bed. Large panels give the wall definition while leaving room for lamps and bedding to stand out. This project suits homeowners or renters with permission, since attached molding usually leaves repairs when it is removed.
Monochrome Bedding Layers

| Styling Detail | Warm Ivory Palette | Deep Charcoal Palette |
| Visual effect | Pale layers make texture the focal point. | Dark layers give the bed a stronger outline. |
| Base layer | Ivory cotton sheets | Soft gray cotton sheets |
| Main covering | Oatmeal linen duvet cover | Charcoal washed cotton duvet cover |
| Texture accent | Cream waffle blanket | Graphite ribbed throw |
| Wall pairing | Warm white or pale beige | Light gray or muted stone |
Texture becomes the decoration when color stays quiet. Combine a smooth sheet, a visibly woven duvet cover, and one textured blanket so the layers remain distinct. Fold the duvet back enough to reveal the sheet. Slight shade differences look intentional when the fabrics share a warm or cool undertone.
Bedside Plant Grouping

DO
- Let greenery frame one side of the bed with a tall floor plant and a smaller companion.
- Match each plant to the actual light beside your bed, checking its care requirements before choosing.
- Use pots with drainage and protective saucers to keep water off furniture and floors.
- Leave enough space to open curtains and reach the bedside comfortably.
DON’T
- Crowd both nightstands with pots that leave no room for daily essentials.
- Let leaves press against pillows or trail across the sleeping surface.
- Place thirsty plants where watering requires reaching over bedding.
- Assume a plant will thrive in a dark corner because it looks good there.
The strongest arrangement uses different heights without filling every gap. Place the taller plant slightly behind the nightstand and the smaller one farther forward, keeping both outside your walking route. Repeat a pot color in a cushion or throw to connect the greenery with the rest of the bed.
Landscape Wall Mural

Result: A sweeping landscape makes the wall itself the focal point.
Best For: Plain bedding and bedrooms with little other wall decoration.
Placement: Main landscape details above the pillow line.
Planning Tip: Check the mural crop against your wall dimensions before ordering.
A bed without headboard panels leaves more of the landscape visible. Choose a mural with an open foreground so the mattress does not hide its most interesting details. Before ordering, mark the mattress and pillow heights on the supplier’s layout preview to check where trees, hills, or buildings land.
Exposed Brick Backdrop

An existing brick wall already brings the texture a headboard might otherwise provide. Let its uneven color and mortar lines remain the main feature by choosing plain bedding and a simple frame. Cream, oatmeal, or muted blue fabrics soften the contrast without competing with the masonry.
Before moving pillows against the surface, check for loose mortar or brick dust and address any shedding. Leave enough clearance to keep bedding from rubbing against rough spots. There is no need to expose more brick: styling an existing, sound wall keeps this idea manageable and preserves its character.
Woven Basket Wall Display

- A cluster of woven baskets gives a blank bed wall texture without the formality of framed art. Choose shallow, lightweight pieces in two or three sizes.
- Arrange an odd-numbered group on the floor first, placing the largest basket slightly off center. Keep the overall display narrower than the mattress.
- Vary the weave while repeating one color across the group. A few dark details can connect the baskets to black lamps or darker furniture.
- Use secure mounting hardware appropriate to each basket and your wall. Keep the lowest edge clear of your head when sitting against the pillows.
The spacing matters more than collecting lots of pieces. Leave a little wall visible between baskets so each outline stays readable, especially from the doorway. Start with three and photograph the arrangement before expanding it. A smaller, balanced group often suits a compact bedroom better than a crowded display.
Tall Bedside Mirror

Quick Tip:
Borrow height from a bedside mirror when the space above your pillows feels empty. Position it beside the mattress, then check its reflection from the doorway and your sleeping position before mounting it securely.
A narrow mirror introduces a strong vertical shape without filling the wall behind the bed. Place it where it reflects daylight or a tidy corner, rather than laundry or an exposed bulb. Repeat its frame finish in the nightstand to help an off-center arrangement feel connected.
Tailored Bed Skirt

BEFORE: Exposed storage boxes and mismatched bed legs draw attention away from otherwise tidy bedding. Without a headboard, these lower details can become the most noticeable part of the setup.
AFTER: A tailored skirt hides the underbed clutter and gives the mattress a clean, continuous base. Straight pleats keep the outline simple, allowing a colorful throw or textured duvet to stand out.
Measure from the skirt’s actual attachment point to the floor before choosing a drop length. Leave the hem slightly clear of the floor so it does not collect dust or catch underfoot. Check compatibility with your frame, especially if you need regular access to drawers or an adjustable base.
Vertical Wood Slat Wall

- Bring the eye upward with vertical slats that continue from behind the bed to the ceiling. Decide whether the feature will span the mattress area or the entire wall.
- Sketch the spacing before buying materials, including the positions of outlets and switches. Center the overall arrangement on the bed.
- Compare a timber sample with your flooring and nightstands in daylight. Choose a compatible undertone rather than expecting different woods to match exactly.
- Use a suitable wall panel system and follow its fixing instructions. For individual slats, use a spacer to keep the gaps consistent and finish rough edges before installation.
The repeated lines give the sleeping area structure without adding another piece of furniture. Keep bedside accessories simple so the wood remains the focus. Slatted surfaces need occasional dusting between strips, so choose spacing you can comfortably clean. This is a more permanent update best planned with the room.
Foot Of Bed Bench

| Detail | Wooden Bench | Upholstered Bench |
| Visual effect | A defined timber outline draws attention to the foot of the bed. | A padded seat adds another soft surface to the room. |
| Daily use | A firm perch for folded bedding | A cushioned seat for getting dressed |
| Upkeep | Wipe according to the wood finish instructions | Vacuum and clean according to the upholstery label |
| Styling partner | Textured bedding and woven accessories | Plain bedding and simple wooden furniture |
Shift the focal point toward the foot of the bed with a bench slightly narrower than the mattress. Choose a height around or below the mattress top for balanced proportions. Measure the remaining walkway before buying, and skip the bench if it makes moving around the room awkward.
Soft Bed Canopy
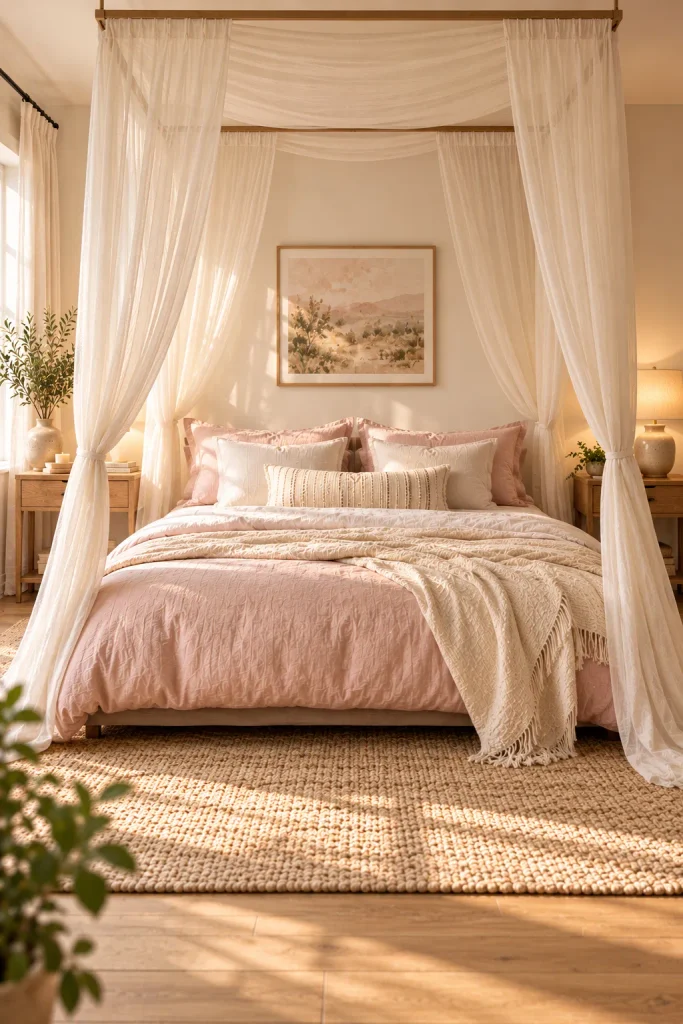
DO
- Frame the sleeping area from above with a simple canopy and softly gathered fabric.
- Use a canopy system designed for your ceiling type and follow its mounting instructions.
- Position fabric outside the sleeping surface so it stays away from faces and pillows.
- Choose washable panels that are easy to remove for cleaning.
DON’T
- Suspend the canopy from adhesive hooks not rated for the installation.
- Let fabric touch lamps, heaters, or ceiling fans.
- Leave trailing cords or loose loops beside the bed.
- Add heavy fabric layers that exceed the mounting system’s stated capacity.
Keep the canopy narrow enough to define the bed without swallowing the bedside furniture. Plain fabric usually works better than busy prints here because the folds already create plenty of detail. In a small room, two side panels can provide the effect while leaving the center visually open.
Window Framed Bed

Result: An existing window supplies the frame above the pillows.
Best For: Rooms with a suitable window wall and limited furniture layouts.
Layout Check: Keep window handles, ventilation, and any required escape access usable.
Finishing Detail: A cordless shade keeps the backdrop visually tidy.
Let the window trim guide the arrangement by centering the mattress beneath it, then balancing the bedside furniture within the available space. Check for drafts and condensation before settling on this layout. Choose another wall if the bed prevents comfortable window operation or puts pillows against damp surfaces.
Oversized Canvas Art

One large canvas gives the space above your pillows a single, clear destination for the eye. Choose artwork with a generous area of quiet color and a few bold shapes so it reads clearly from the doorway. A horizontal composition echoes the width of the mattress.
Make a paper template before choosing the final size, leaving visible wall on both sides. Sit upright against your pillows to establish a comfortable lower edge. Use secure fixings suited to the artwork and wall, and pull one accent color from the canvas into your bedding scheme.
Asymmetric Bedside Styling

- Unequal bedside spaces can become part of the design. Place a wider chest on the roomy side and a compact table on the narrower side.
- Balance a taller piece on one side with a floor lamp on the other. Similar overall heights can connect furniture with different shapes.
- Repeat one finish or color across both sides, such as black lamp details or warm wood tones. The pieces need a shared detail, not identical dimensions.
- Keep essentials within reach from each sleeping position. A small table still needs enough usable surface for the items its sleeper actually keeps nearby.
Asymmetry feels deliberate when each side has a clear job. A chest can hold clothing while a small table handles a book and water glass. Stand at the foot of the bed to check the balance, then remove any accessory that makes the narrower side feel crowded.
Painted Ceiling Accent

Quick Tip:
Give the room a focal point overhead with a softly colored ceiling. Test a large sample on the ceiling itself, since its angle and lighting can make the shade appear different from the same paint on a wall.
Keep the bed wall simple so the overhead color has room to stand out. Repeat a lighter or deeper version in one cushion or throw, then leave the remaining bedding neutral. Ceiling painting involves overhead work, so plan stable access and protect the bed and flooring before starting.
Recessed Bed Nook
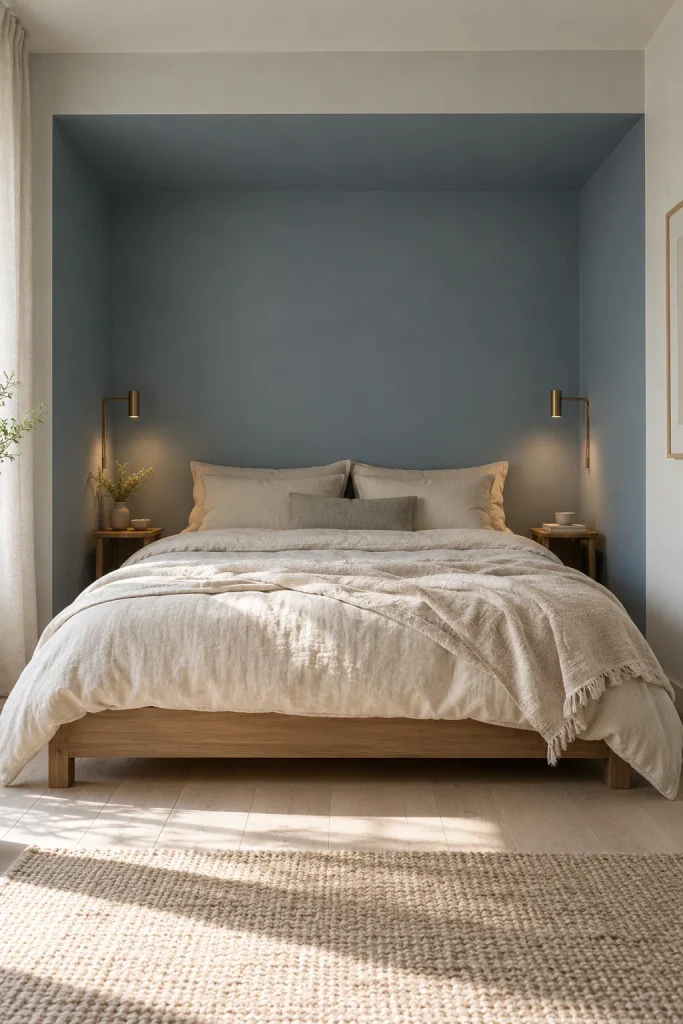
BEFORE: An unused wall recess can leave the bedroom layout feeling awkward. Furniture placed across its edges interrupts the architecture, while the empty space behind the pillows looks accidental.
AFTER: Centering the bed within a suitable recess lets the surrounding walls define the sleeping area. Plain bedding and compact bedside pieces keep the outline visible, giving the bed a finished setting without another furniture panel.
Measure the recess against the full bed frame, not just the mattress. Allow room to change sheets, reach outlets, and get in comfortably. A shallow recess can frame only the upper part of the bed, leaving the sides open for easier access and more flexible bedside furniture placement.
Washi Tape Wall Frame
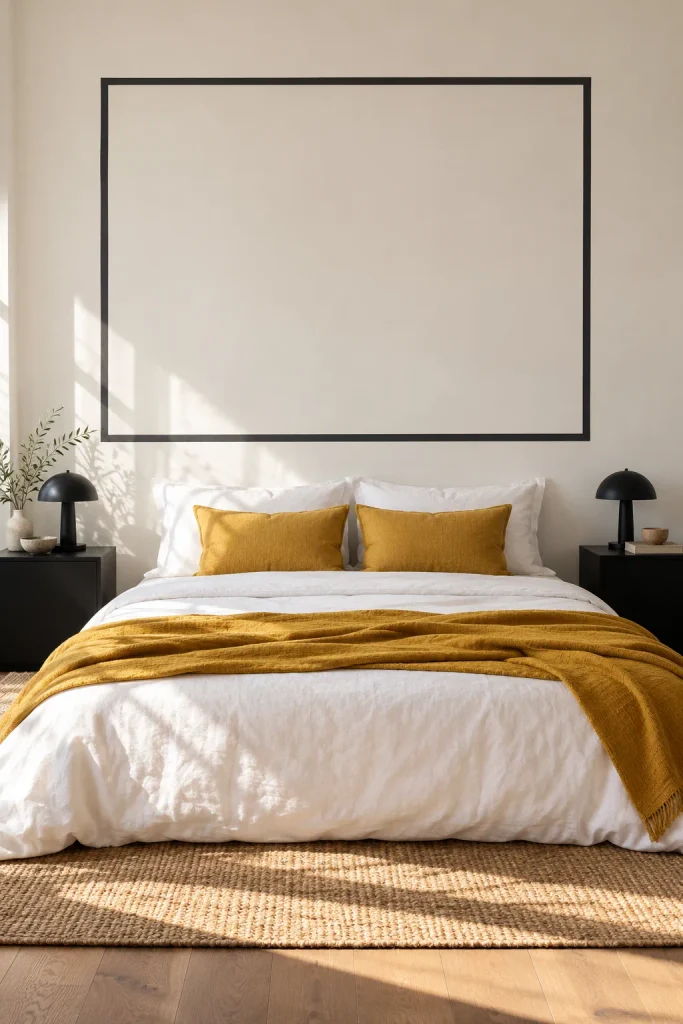
- Draw attention to the empty wall with a simple tape outline that suggests a decorative frame. Choose one color already present in your bedding or lamps.
- Test the tape on an inconspicuous area and check the manufacturer’s surface guidance. Washi tape can still mark paint or lift a fragile finish.
- Mark a wide rectangle above the pillow line with light pencil guides and a level. Keep its outer edges within the width of the mattress.
- Apply the tape in straight lengths, pressing gently and trimming neat corners. Leave the center empty so the outline remains the main feature.
Narrow tape creates a delicate border, while wider tape produces a bolder graphic shape. Keep the design simple enough to straighten without repeatedly lifting the adhesive. Smooth, sound paint is the best starting point; textured or flaky surfaces can make the edges look uneven and prevent consistent adhesion.
Minimal Bare Wall

| Styling Detail | Warm Minimalism | Graphic Minimalism |
| Bed frame | Pale oak with visible grain | Slim black metal or dark wood |
| Bedding | Ivory sheets and an oatmeal blanket | White sheets with a charcoal throw |
| Bedside furniture | Simple wooden tables | Compact tables with clean black outlines |
| Finishing detail | One textured ceramic lamp | One lamp with a defined geometric shape |
The empty wall can be a deliberate part of the design. Make the bed itself feel complete with neatly arranged pillows, balanced bedding, and a visible frame you like. Clear away stray cables and excess bedside objects. With fewer decorations, those small finishing details become much more noticeable.
Conclusion
A bed without headboard can still be the focal point of a bedroom you love. From soft cushions and colorful quilts to painted arches and simple wall art, these ideas offer plenty of ways to give it a finished look.
Start with one change that suits your budget, available space, and daily routine. Live with it for a few days before adding more.
Save this post on Pinterest so your favorite ideas are easy to find, and share it with someone decorating their bedroom. Choose one detail to try this weekend and make your bed feel a little more yours.